Building Secure Connections: Site-to-Site VPN between AWS and Mikrotik V7 — The demand for secure and dependable network connectivity between different locations is on the rise. Site-to-Site VPNs offer a solution, allowing two networks, even those far apart, to securely connect via the public internet. This article provides a step-by-step guide to configuring a Site-to-Site VPN between Amazon Web Services (AWS) and a Mikrotik V7 router.
The Problem
Case Study: Connecting an Office Network to AWS with a Site-to-Site VPN
Many mid-sized companies may lack the Autonomous System Number (ASN) required for dynamic routing like BGP. In these cases, static routing offers a practical and efficient way to connect on-premises networks to the cloud.
Imagine an office with a network managed by a Mikrotik RouterOS V7 and a desire to integrate it with AWS. We’ll build a secure site-to-site VPN using IPSec and static routing. Why static routing? It’s simpler to configure, doesn’t need an ASN, and is sufficient for relatively stable network setups.
Detail Information
AWS Cloud
CIDR VPC : 10.10.10.0/24
On-premise Network
Network Segment : 192.168.0.0/16
Public IP : 118.64.121.32

The Solution
Connecting our office network to AWS via a Site-to-Site VPN involves a few simple steps. First, we’ll make sure our Mikrotik is ready and online. Then, we’ll set up a VPN Gateway in AWS and configure it to talk to our Mikrotik router.
Execute The Solution
AWS Configuration
Make sure you already have a VPC

Create Customer Gateway
The Customer Gateway is used to store the public IP and endpoint information of the on-premises network (in this case, the Mikrotik device) in AWS.
VPC > Customer Gateways > Create Customer Gateway

Complete the form with the following details:
Name: Use a descriptive name like “CustomerGateway_Mikrotik”.
BGP ASN: Leave this blank unless you’re using BGP routing. For static routing, leave it blank.
IP address: Enter the public IP of the Mikrotik interface used for the VPN.
Device type: Selecting “Mikrotik” is optional and doesn’t affect functionality.
Click Create Customer Gateway when finished.

Create Virtual Private Gateway
The Virtual Private Gateway acts as the AWS-side VPN endpoint that connects to the Customer Gateway (Mikrotik device).
VPC > Virtual Private Gateways > Create Virtual private gateway

Use the following information for the form:
Name tag: Give it a descriptive name like “VGW_to_Mikrotik”.
Amazon side ASN: (Optional) Specify an ASN for AWS. If you’re not using BGP, leave it as “Amazon default ASN”.
Click Create Virtual Private gateway.

This might take a while. Wait for the VGW status to become “Detached”.

Attaching the VGW to the VPC:
When the VGW is “Detached,” select it. And Click Actions and click Attach to VPC.
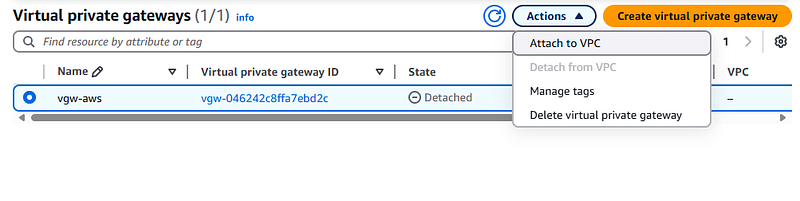
Choose the VPC you want to connect it to. and Click Attach to VPC.

Create Site To Site Connection
We will build a VPN connection between the VGW (in AWS) and the Customer Gateway (Mikrotik).
VPC > Site-to-Site VPN connections > Create VPN connection

Use the following information for the form:
Name tag: Use a descriptive name like “VPN_Mikrotik_to_AWS”.
Target Gateway Type: Choose Virtual Private Gateway.
Virtual Private Gateway: Select the VGW you created earlier.
Customer Gateway: Select the Customer Gateway you created earlier.
Routing Options: Choose Static.
Static IP Prefixes: Enter the on-premises network’s CIDR block (behind the Mikrotik). Example: 192.168.0.0/16.
Local IPv4 Network CIDR: Enter the on-premises network’s CIDR block (same as Static IP Prefixes). Example: 192.168.0.0/16.
Remote IPv4 Network CIDR: Enter your VPC’s CIDR block in AWS. Examples: 10.0.0.0/16 or 10.10.10.0/24.
Click Create VPN Connection

Download VPN Configuration :
Once the VPN Connection is created, select it. And Click Download Configuration.

Choose Mikrotik as the vendor. Click Download. The configuration file will download as a text file. This file contains key information like the pre-shared key and IKE/IPsec parameters.

Mikrotik Configuration
Configuration IPSec Proposal
Defining security parameters for the second (IPSec) phase of the VPN connection, including encryption, authentication, and Perfect Forward Secrecy (PFS).
CLI Version
/ip ipsec proposal add auth-algorithms=sha1 enc-algorithms=aes-128-cbc lifetime=1h pfs-group=modp1024 name=aws-proposalWinbox
IP > IPSec >Proposals > Create New Rules

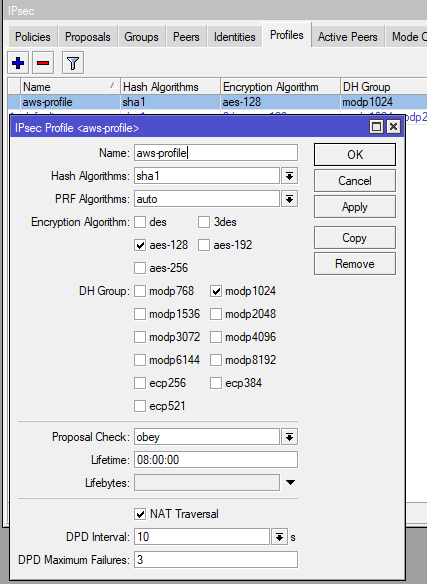
Configuration IPSec Profile
Defining security parameters for the first (IKE or IKEv2) phase of the VPN connection, including encryption, hashing, and the Diffie-Hellman group
CLI Version
/ip ipsec profile add name=aws-profile nat-traversal=no proposal-check=obey hash-algorithm=sha1 enc-algorithm=aes-128 dh-group=modp1024 lifetime=8h lifebytes=0 dpd-interval=10s dpd-maximum-failures=3Winbox
IP > IPSec > Profiles > Create New Rules
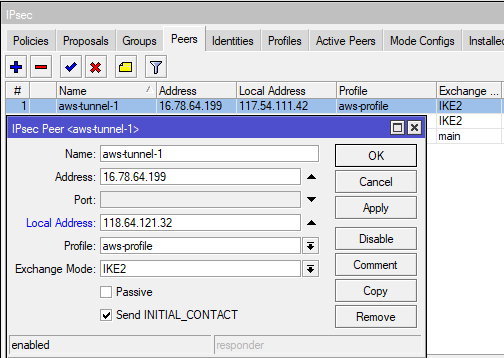
Configuration IP Sec Peer
CLI Version
/ip ipsec peer add name="Tunnel 1" address=<SA Dst. Address>/32 local-address=<SA Src. Address> exchange-mode=main send-initial-contact=yes profile=aws-profileWinbox :
IP > IPSec > Peers > Create New Rules
Note :
address=<SA Dst. Address>/32: VGW's public IP (from the AWS config file).local-address=<SA Src. Address>: Mikrotik's public IP (from the AWS config file).Tunnel-1
Tunnel-2

Configuration IP Sec Identities
Authenticating the VPN connection with the pre-shared key from AWS.
CLI Version
/ip ipsec identity add peer="<peer>" auth-method=pre-shared-key secret="<Secret>" generate-policy=noWinbox :
IP > IPSec > Identities > Create New Rules
Tunnel 1

Tunnel 2

Configuration IP Sec Policy
Our on-premises network is divided into two segments: 192.168.1.0/24 and 192.168.10.0/24. To route traffic for both segments over our IPsec VPN, we’ll configure two separate IPsec policies with summarized address ranges. This is necessary because a single IPsec policy cannot cover multiple, non-contiguous network segments. For instance:
Tunnel 1: Src-Address: 192.168.0.0/20 (covering 192.168.0.0–192.168.15.255)
Tunnel 2: Src-Address: 192.168.0.0/16 (covering 192.168.0.0–192.168.255.255)
These two segments encompass the entire IP address space of our on-premises network.
CLI Version
Tunnel 1
/ip ipsec policy add peer="<peer-1>" tunnel=yes src-address=192.168.0.0/20 src-port=any dst-address=10.10.10.0/24 dst-port=any protocol=all action=encrypt level=require proposal=aws-proposalTunnel 2
/ip ipsec policy add peer="<peer-2>" tunnel=yes src-address=192.168.0.0/16 src-port=any dst-address=10.10.10.0/24 dst-port=any protocol=all action=encrypt level=require proposal=aws-proposalWinbox
IP > IPSec > Policy > Create New Rules
Tunnel-1

Tunnel-2

Action Tab

Configuration Firewall NAT
To allow traffic from the AWS network (10.10.10.0/24) to reach the on-premises network (192.168.0.0/16), we need to configure NAT on the Mikrotik.
CLI Version
/ip firewall nat add action=accept chain=srcnat dst-address=192.168.0.0/16 log=yes src-address=10.10.10.0/24Winbox
IP > Firewal > NAT > Create New Rules


Routing Configuration
AWS Site To Site Routing
Add Static Routing to the VPN Connection
Go to VPC > Site-to-Site VPN Connections > Select your VPN > Static Routes > Edit routes

VPC Route Tables
Add a Route to all Route Tables in your VPC with the following:
Destination: On-premises Network (192.168.0.0/16)
Target: Your Virtual Private Gateway

Verification Network
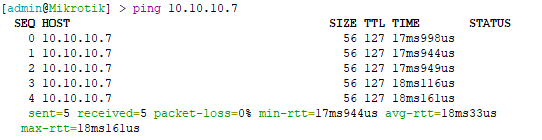
Ping From Mikrotik To Ec2 Instance
Ping From Ec2 To On-premise Network

Conclusion
We’ve walked through the detailed steps of setting up a secure Site-to-Site VPN between an on-premises network using Mikrotik RouterOS V7 and AWS in this article. We covered configurations on both sides, including creating the Customer Gateway and Virtual Private Gateway on AWS, and configuring IPsec Proposal, Profile, Peer, Identity, Policy, and NAT on the Mikrotik.
We hope this guide helps you set up a secure and reliable Site-to-Site VPN connection. With this connection, you can easily integrate your local network with AWS. Happy configuring and good luck!